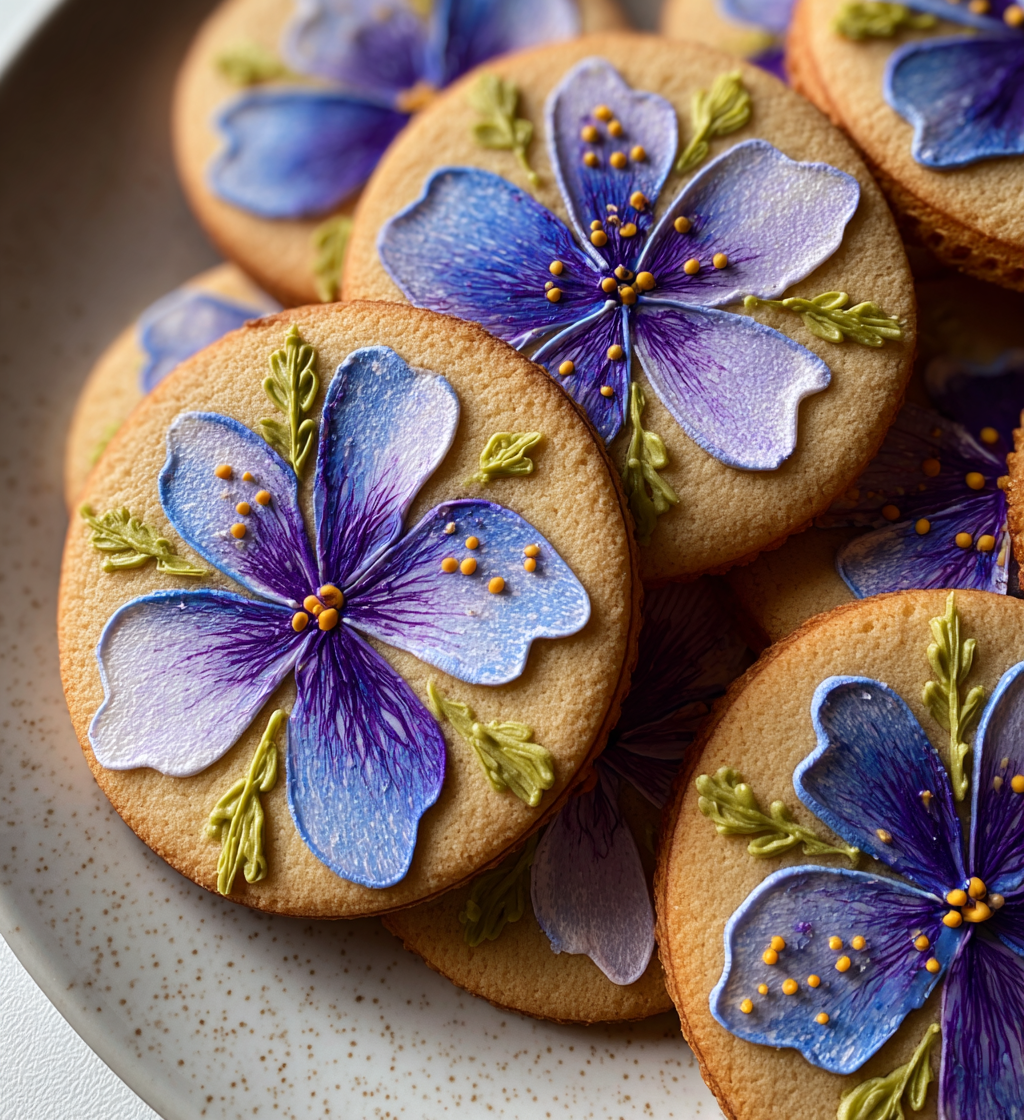
Spring Theme Cookies Decorated: Fresh, Floral, and Fun
I’ve always loved the idea of turning a simple cookie into a piece of springtime art. The scent of fresh blossoms, the bright colors of new leaves, and the gentle warmth of the sun—these are the feelings I want to capture in every bite. That’s why I’m excited to share my favorite spring theme cookies decorated recipe. It’s quick, it’s delicious, and it’s a perfect way to bring a touch of nature into your kitchen.

Why You’ll Love This Recipe
- Fresh, floral flavors that evoke the season.
- Easy to decorate with edible flowers and pastel icings.
- Perfect for parties, gifts, or a cozy afternoon treat.
- Uses simple pantry staples—no fancy ingredients required.
- Great for beginners and seasoned bakers alike.
Ingredients
- 1 cup unsalted butter, softened
- 1 cup granulated sugar
- 1 large egg
- 1 teaspoon vanilla extract
- 2 ½ cups all‑purpose flour
- 1 teaspoon baking powder
- ½ teaspoon salt
- ¼ cup milk
- 1 tablespoon fresh lemon zest
- 1 tablespoon fresh lemon juice
- For the icing:
- 1 cup powdered sugar
- 2 tablespoons milk
- 1 teaspoon vanilla extract
- Food coloring (pink, green, yellow, lavender)
- Edible flowers (roses, violets, pansies) and fresh mint leaves for garnish
How to Make Spring Theme Cookies Decorated
- Preheat your oven to 350°F (175°C) and line a baking sheet with parchment paper.
- Cream the butter and sugar together in a large bowl until light and fluffy—about 2 minutes.
- Add the egg and vanilla and beat until fully incorporated.
- In a separate bowl, whisk together the flour, baking powder, and salt.
- Gradually add the dry mixture to the wet mixture, alternating with the milk, until a soft dough forms.
- Fold in the lemon zest and lemon juice for a bright, citrusy note.
- Cover the dough and chill for 30 minutes; this makes rolling easier.
- On a lightly floured surface, roll the dough to about ¼ inch thickness.
- Use a round cookie cutter (or a small glass) to cut out shapes—think flowers, leaves, or simple circles.
- Place the cutouts on the prepared baking sheet, spacing them about 2 inches apart.
- Bake for 10–12 minutes, or until the edges are lightly golden.
- Let the cookies cool on the sheet for 5 minutes before transferring to a wire rack to cool completely.
- While the cookies cool, prepare the icing: whisk powdered sugar, milk, and vanilla until smooth. Divide into separate bowls and tint each with a different food coloring.
- Using a small piping bag or a plastic bag with a tiny corner cut, pipe designs onto each cookie—think petals, vines, or simple dots.
- Garnish with edible flowers and a fresh mint leaf for that authentic spring feel.
- Allow the icing to set for 15 minutes before serving or storing.
Tips for Best Results
- Chill the dough: It prevents spreading and keeps the cookies crisp.
- Use fresh lemon zest for a vibrant flavor—avoid dried zest.
- For a softer cookie, bake a minute less; for a crispier one, bake a minute more.
- Keep the icing cool in the fridge if you’re planning a large batch—this stops it from running.
- Store in an airtight container at room temperature; they stay fresh for up to a week.
Variations
- Herb‑Infused: Add 1 tablespoon finely chopped fresh rosemary or thyme to the dough for a savory twist.
- Chocolate‑Covered: Melt ½ cup dark chocolate and drizzle over cooled cookies before icing.
- Gluten‑Free: Substitute all‑purpose flour with a 1:1 gluten‑free blend.
- Vegan: Replace butter with coconut oil and use a flax egg (1 tbsp ground flaxseed + 3 tbsp water).
Storage
Keep the cookies in a sealed container at room temperature. They’ll stay fresh for up to 7 days. If you need to reheat, pop them in a 350°F oven for 2 minutes to revive crispness.
Print
Spring Theme Cookies Decorated: Fresh, Floral, and Fun
- Total Time: 40 mins
- Yield: 6 servings 1x
- Diet: Halal
Description
Make spring theme cookies decorated that bloom with color and flavor. Easy, fresh, and perfect for any occasion!
Ingredients
Scale
- 1 cup unsalted butter, softened
- 1 cup granulated sugar
- 1 large egg
- 1 teaspoon vanilla extract
- 2 ½ cups all‑purpose flour
- 1 teaspoon baking powder
- ½ teaspoon salt
- ¼ cup milk
- 1 tablespoon fresh lemon zest
- 1 tablespoon fresh lemon juice
- For the icing:
- 1 cup powdered sugar
- 2 tablespoons milk
- 1 teaspoon vanilla extract
- Food coloring (pink, green, yellow, lavender)
- Edible flowers (roses, violets, pansies) and fresh mint leaves for garnish
Instructions
- Preheat your oven to 350°F (175°C) and line a baking sheet with parchment paper.
- Cream the butter and sugar together in a large bowl until light and fluffy—about 2 minutes.
- Add the egg and vanilla and beat until fully incorporated.
- In a separate bowl, whisk together the flour, baking powder, and salt.
- Gradually add the dry mixture to the wet mixture, alternating with the milk, until a soft dough forms.
- Fold in the lemon zest and lemon juice for a bright, citrusy note.
- Cover the dough and chill for 30 minutes; this makes rolling easier.
- On a lightly floured surface, roll the dough to about ¼ inch thickness.
- Use a round cookie cutter (or a small glass) to cut out shapes—think flowers, leaves, or simple circles.
- Place the cutouts on the prepared baking sheet, spacing them about 2 inches apart.
- Bake for 10–12 minutes, or until the edges are lightly golden.
- Let the cookies cool on the sheet for 5 minutes before transferring to a wire rack to cool completely.
- While the cookies cool, prepare the icing: whisk powdered sugar, milk, and vanilla until smooth. Divide into separate bowls and tint each with a different food coloring.
- Using a small piping bag or a plastic bag with a tiny corner cut, pipe designs onto each cookie—think petals, vines, or simple dots.
- Garnish with edible flowers and a fresh mint leaf for that authentic spring feel.
- Allow the icing to set for 15 minutes before serving or storing.
Notes
- Chill the dough: It prevents spreading and keeps the cookies crisp.
- Use fresh lemon zest for a vibrant flavor—avoid dried zest.
- For a softer cookie, bake a minute less; for a crispier one, bake a minute more.
- Keep the icing cool in the fridge if you’re planning a large batch—this stops it from running.
- Store in an airtight container at room temperature; they stay fresh for up to a week.
- Prep Time: 15 mins
- Cook Time: 25 mins
- Category: Dessert
- Method: Cooking
- Cuisine: American
Nutrition
- Serving Size: 1 serving
- Calories: 320
- Sugar: 8g
- Sodium: 420mg
- Fat: 14g
- Saturated Fat: 4g
- Unsaturated Fat: 9g
- Trans Fat: 0g
- Carbohydrates: 24g
- Fiber: 3g
- Protein: 24g
- Cholesterol: 70mg
Keywords: spring theme cookies decorated
FAQs
- Can I use store‑bought icing? Yes—just make sure it’s smooth and not too thick.
- What if I don’t have edible flowers? Fresh mint leaves or a sprinkle of crushed pistachios can add a nice touch.
- How long can I keep the dough chilled? Up to 24 hours—just cover tightly to avoid drying out.
- Can I freeze the cookies? Absolutely. Freeze baked cookies on a sheet, then transfer to a bag. Reheat at 350°F for 5 minutes.