Stick of Butter Chicken & Rice: The Viral Comfort Food Phenomenon
There are recipes that are technically impressive, requiring hours of chopping, sautéing, and reducing sauces. And then, there are recipes that simply taste good. The kind of recipes that feel like a warm blanket on a cold day. The kind that you make when you have had a long day at work, the kids are hungry, and you have exactly five minutes of energy left to give to the kitchen.
Welcome back to Recipes Nora! Today, we are diving into a dish that has taken the internet by storm but has roots deep in traditional American community cookbooks: Stick of Butter Chicken & Rice.
If the name sounds indulgent, that’s because it is. We are not hiding the butter here; we are celebrating it. This is a classic “dump-and-bake” casserole where uncooked rice, chicken, broth, and creamy soup are layered in a pan, topped with a generous seasoning of onion soup mix, and crowned with a full stick of sliced butter.
It sounds almost too simple to be good. You might be wondering, “Noah, won’t the rice be mushy? Won’t the chicken be dry?”
Trust me when I say this: magic happens in that oven. As the butter melts, it emulsifies with the broth and the soup to create a rich, savory, golden gravy that permeates every single grain of rice. The chicken steams gently on top, remaining incredibly juicy, while the onion soup mix provides a deep, savory umami punch that tastes like you spent hours simmering a stock.
In this deep-dive guide, I am going to walk you through exactly why this method works, the specific type of rice you must use to avoid disaster, and how to customize this retro classic for a modern palate.
Let’s get comfortable!
What is Stick of Butter Chicken?
At its core, this dish is a variation of the classic “No-Peek Chicken” or “Forgotten Chicken” casseroles of the 1970s. It was designed for busy home cooks who needed a complete meal—protein, starch, and sauce—in one pan.
The method is unique because it defies standard cooking logic. Usually, we are taught to sear chicken before baking it or to boil rice separately. Here, everything goes in raw. The tightly sealed foil creates a steam chamber (essentially a low-tech pressure cooker environment) that cooks the rice and chicken simultaneously while the butter provides the necessary fat to keep the grains separate and flavorful.
It has recently gone viral on TikTok and Instagram because it is visually satisfying to assemble and virtually foolproof to cook.
Why This Recipe Works
As a chef, I am usually skeptical of “hack” recipes involving canned soup. But I have to give credit where it is due—this recipe is a masterclass in chemistry and texture.
- The Fat-Starch Interaction: Rice is a starch. When cooked in water alone, it can be bland. When cooked in broth and butter, the fat coats the granules. This prevents them from clumping together into a sticky mess and instead creates a fluffy, risotto-like texture that is rich and velvety.
- The “Steam Roast”: By covering the pan with foil for the first 45 minutes, we are steaming the chicken. This is the gentlest way to cook poultry, ensuring it stays tender. By removing the foil for the last 15 minutes, we allow the Maillard reaction (browning) to happen, giving the chicken an appetizing color and roasting the top layer of rice to a slight crisp.
- The Umami Bomb: The packet of onion soup mix contains dehydrated onions, beef bouillon, and spices. This is concentrated umami. When mixed with the cream of mushroom soup, it creates a flavor profile that mimics a slow-cooked beef stroganoff sauce, but with chicken.
- Convenience: There is zero chopping required. You don’t even need a cutting board if you buy pre-trimmed chicken. It is the definition of “low effort, high reward.”
Ingredient Deep Dive: The Success Factors
Since there are only 5 or 6 ingredients, choosing the right ones is the difference between a delicious dinner and a salty, mushy failure.
The Rice (The Most Important Choice)
- Long Grain White Rice: You must use standard long-grain white rice (like Jasmine, Basmati, or generic American long-grain).
- The “Instant” Mistake: Do not use Minute Rice or Instant Rice. It will turn into paste after an hour in the oven.
- Brown Rice: Brown rice has the bran layer intact and requires more liquid and a longer cooking time (about 1.5 hours). If you try to swap it 1:1 in this recipe, you will end up with crunchy, undercooked rice and dry chicken. Stick to white rice for this specific method.
The Chicken
- Thighs vs. Breasts: I strongly recommend using Boneless, Skinless Chicken Thighs. Thighs have more connective tissue and fat, which means they can withstand the long cooking time without drying out. They become melt-in-your-mouth tender.
- Using Breasts: If you prefer white meat, use chicken breasts, but try to cut them into even sizes or pound them slightly so they aren’t too thick. Thick breasts might dry out before the rice is fully done.
The “Cream” Element
- Cream of Mushroom: This is the traditional choice. It adds an earthy depth that pairs well with the onion mix.
- Cream of Chicken/Celery: If you have picky eaters who hate mushrooms, Cream of Chicken is a perfect substitute. It makes the dish taste more like a pot pie filling.
- Sodium Watch: These soups can be salty. I recommend buying the “Low Sodium” or “Heart Healthy” versions so you can control the seasoning yourself.
The Butter
- Unsalted Butter: This is non-negotiable for me. The canned soup, the broth, and the onion soup mix all contain high levels of salt. If you use salted butter on top of that, the dish might be inedible. Use unsalted butter to add richness without the sodium spike.
Step-by-Step Instructions
This recipe is all about the layers. Do not stir everything together! The layering ensures the rice cooks in the liquid while the chicken sits on top.
Step 1: The Rice Base
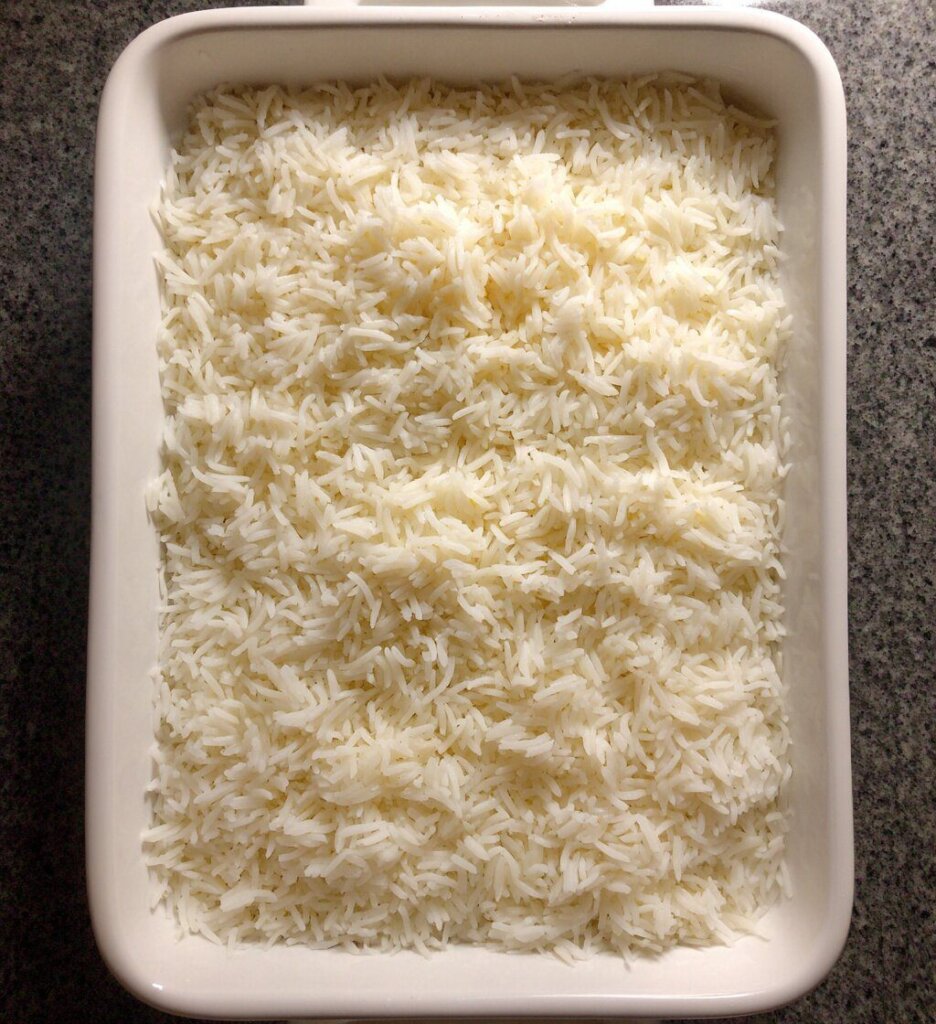
Preheat your oven to 375°F (190°C). Take a 9×13 inch baking dish and spray it lightly with non-stick spray. Pour the cup of uncooked rice directly into the bottom of the dish. Spread it out so it covers the bottom evenly.
Step 2: The Liquid Gold
In a mixing bowl or large measuring cup, combine the chicken broth and the can of cream of mushroom soup. Whisk them together until the soup is broken up and mostly smooth. Pour this liquid gently over the rice.
- Chef Noah’s Tip: Give the rice a tiny, gentle stir with a fork just to make sure every grain is wet and submerged. Do not stir vigorously.
Step 3: The Chicken Layer
Place your chicken pieces on top of the wet rice. Try not to overlap them too much; we want them to cook evenly. If you are using chicken breasts, nestle them slightly into the liquid. If using thighs, just lay them flat on top.
Step 4: The Seasoning
Open the packet of dry Onion Soup Mix (like Lipton). Sprinkle the entire packet evenly over the chicken and the exposed rice/liquid areas. Add a dusting of garlic powder and black pepper over the top. You do not need extra salt.
Step 5: The Butter Crown
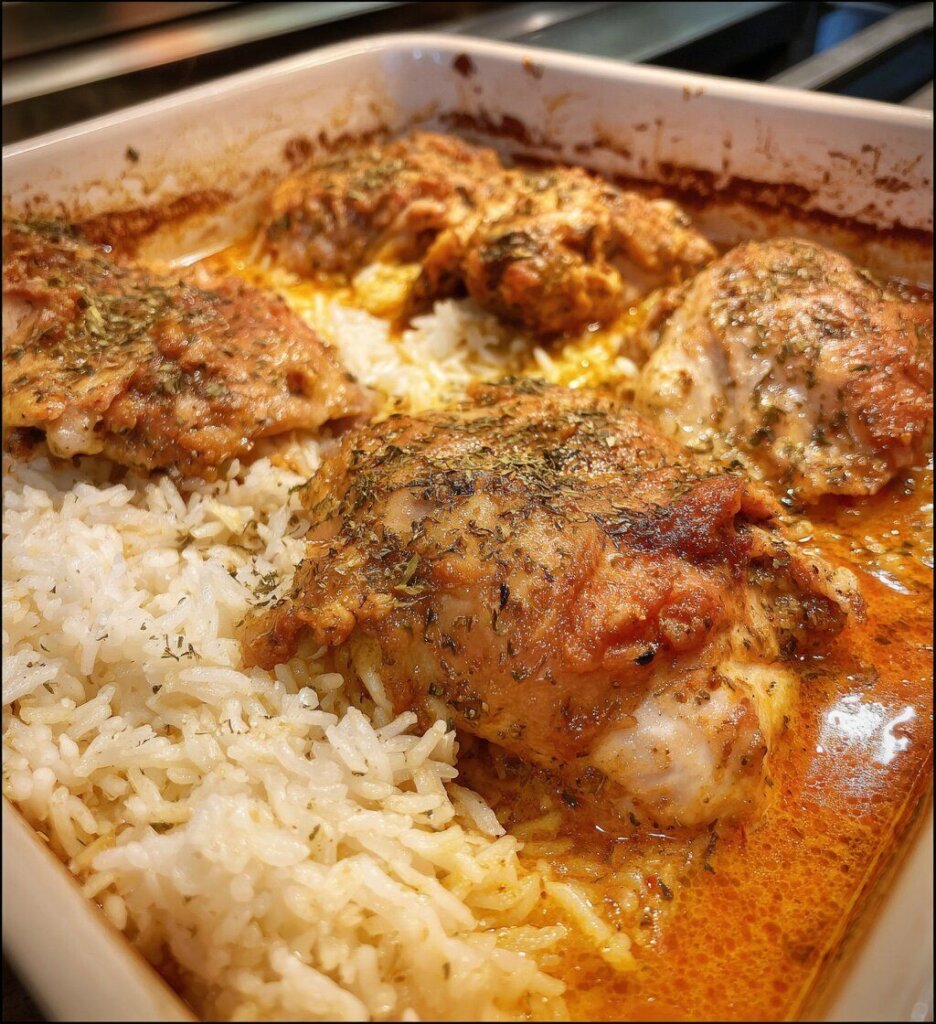
Take your stick of butter and slice it into thin pats (squares). Place these butter squares all over the top of the casserole—on the chicken and on the rice. It doesn’t have to be perfect.
- Why? As it bakes, the butter melts down, basting the chicken and adding a golden sheen to the sauce.
Step 6: The Bake
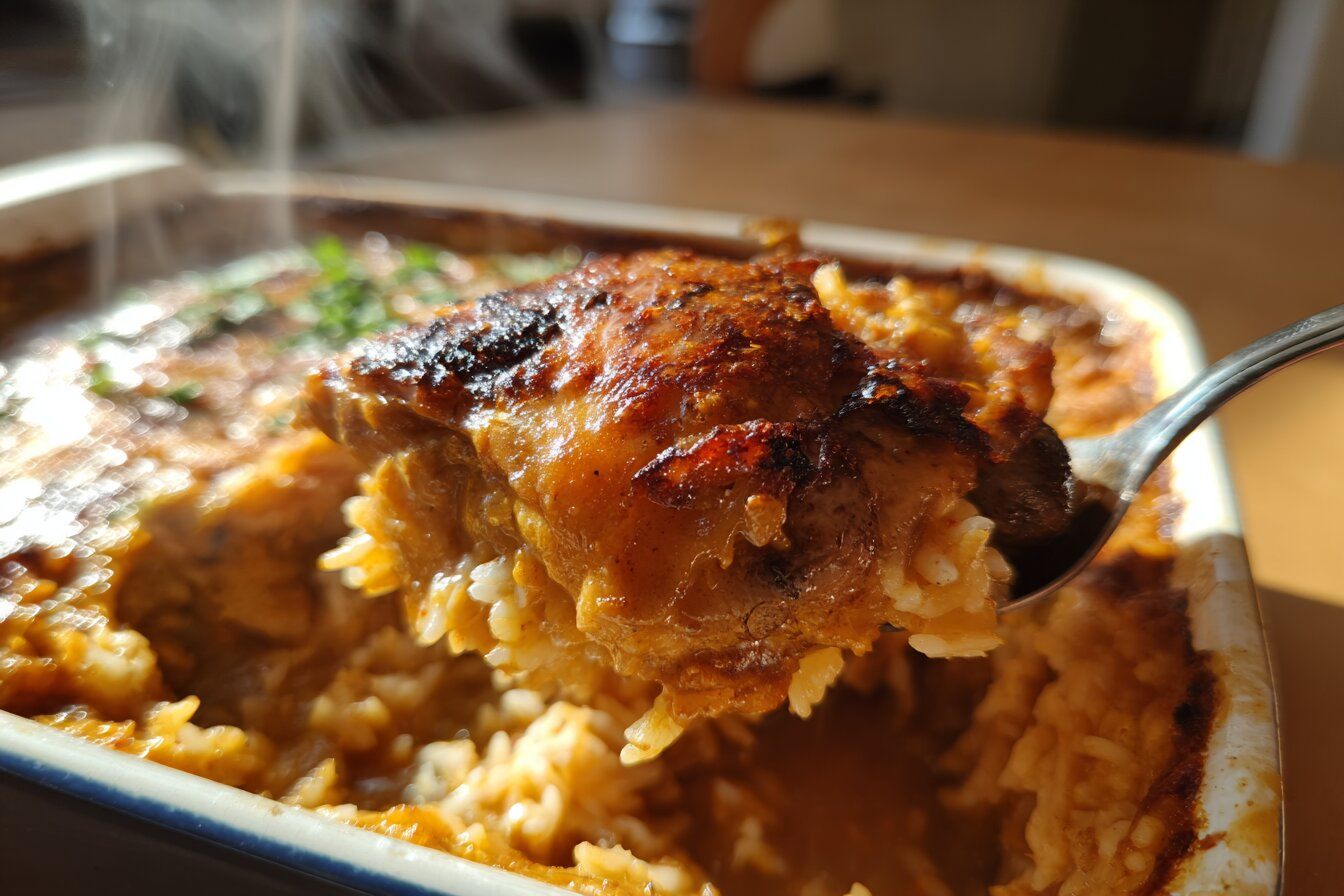
Crucial Step: Cover the dish with heavy-duty aluminum foil. Seal the edges tightly around the rim of the dish. We want to trap all the steam inside. Bake for 45 minutes. No peeking! After 45 minutes, remove the foil. Be careful of the steam. Bake uncovered for another 10 to 15 minutes. This evaporates excess liquid and browns the chicken.
Step 7: The Rest
Remove from the oven. It will look very bubbly and liquidy. Let it stand for 5-10 minutes. During this time, the rice will absorb the remaining liquid and the sauce will thicken. Fluff the rice around the chicken with a fork before serving.
Troubleshooting Common Issues
Even easy recipes can have hiccups. Here is how to fix them.
1. “My rice is crunchy!” This usually means your foil wasn’t sealed tight enough and the steam escaped. Or, your oven runs cooler than 375°F.
- The Fix: If you open it and the rice is hard, splash 1/4 cup of boiling water over the dry spots, reseal the foil tightly, and bake for another 15 minutes.
2. “It’s too soupy!” Rice brands vary in how much liquid they absorb.
- The Fix: If it looks like soup when you take it out, let it sit uncovered on the counter for 10-15 minutes. The rice acts like a sponge and will continue soaking up sauce as it cools.
3. “The chicken is pale.” Since we are steaming the chicken, it won’t get dark brown crispy skin like fried chicken.
- The Fix: If you want more color, turn your oven to “Broil” for the last 2-3 minutes of cooking. Watch it closely so the onion bits don’t burn!
Variations to Try
Once you master the base, you can get creative.
- The Veggie Loaded Version: To make this a true one-dish meal, stir in a cup of frozen peas and carrots or fresh broccoli florets with the rice before adding the chicken.
- The “Cheesy” Version: In the last 5 minutes of baking (uncovered), sprinkle a cup of shredded cheddar or mozzarella cheese over the top and let it melt.
- Homemade Seasoning: If you are avoiding MSG or preservatives, skip the onion soup packet. Instead, mix: 1 tbsp dried minced onion, 1 tsp onion powder, 1 tsp beef bouillon granules, ½ tsp dried parsley, and ¼ tsp celery salt.
- Garlic Butter Style: Swap the onion soup mix for a packet of “Garlic & Herb” dressing mix for a different flavor profile.
What to Serve with Stick of Butter Chicken
This is a rich, carb-heavy, and salty dish. You need fresh, acidic, or crunchy sides to balance the palate.
- Steamed Green Beans: The snap of fresh green beans with a squeeze of lemon juice cuts through the richness of the butter rice.
- A Big Green Salad: A simple salad with romaine, cucumber, and a sharp vinaigrette is the perfect refresher between bites.
- Roasted Carrots: The sweetness of roasted carrots complements the savory onion flavor.
- Dinner Rolls: Yes, it’s carb-on-carb, but dipping a soft roll into the buttery rice gravy is a spiritual experience.
Storage and Reheating
This is one of those dishes that actually tastes better the next day as the flavors meld.
- Fridge: Store leftovers in an airtight container for up to 4 days.
- Freezing: You can freeze portions of the cooked casserole. Let it cool completely, then freeze for up to 3 months.
- Reheating:
- Microwave: Add a teaspoon of water to the rice (to rehydrate it), cover with a damp paper towel, and heat for 2-3 minutes.
- Oven: Cover with foil and bake at 350°F for 20 minutes until hot.
Final Thoughts
Stick of Butter Chicken & Rice is comfort food in its purest form. It reminds us that cooking doesn’t always have to be about fancy techniques or expensive ingredients. Sometimes, it’s just about combining simple pantry staples to create a meal that feeds the soul.
The smell of the buttery onion rice wafting through your house is enough to bring the whole family to the table. It’s hearty, it’s savory, and yes, it’s buttery.
So, preheat that oven and get ready for the easiest dinner win of your week.
Happy Cooking! Chef Noah
Print
Stick of Butter Chicken & Rice: The Viral Comfort Food Phenomenon
- Total Time: 1 hour 5 minutes
- Yield: 4 Servings 1x
- Diet: Halal
Description
A viral comfort food classic. Uncooked rice, chicken, broth, and soup are baked together with onion seasoning and a stick of butter for a rich, savory casserole.
Ingredients
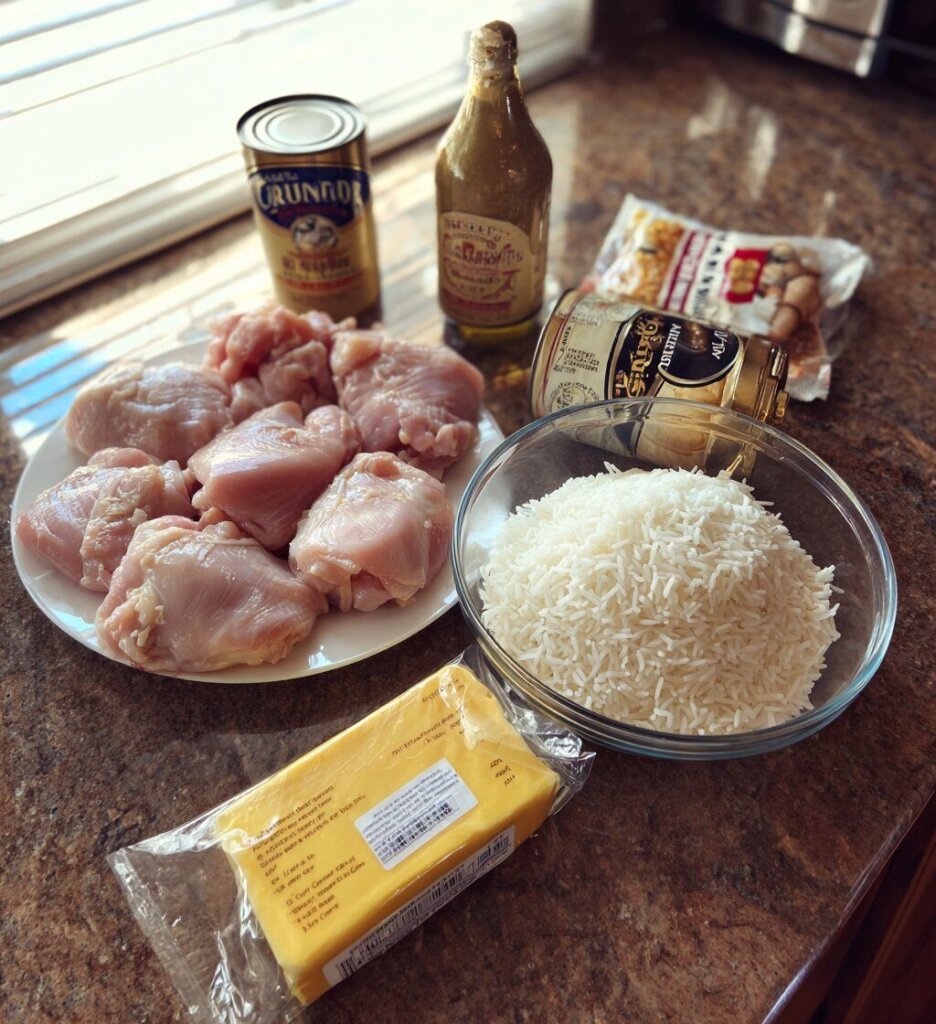
- 4–6 Chicken Thighs
- 1 cup White Rice (uncooked)
- 1 can Cream of Mushroom Soup
- 1.5 cups Chicken Broth
- 1 packet Onion Soup Mix
- 1/2 cup Unsalted Butter
- 1 tsp Garlic Powder
Instructions
- Preheat oven to 375°F. Grease a 9×13 dish.
- Spread rice in the dish. Whisk soup and broth, then pour over rice.
- Place chicken on top. Sprinkle with onion mix and garlic powder.
- Top with sliced butter pats.
- Cover with foil and bake 45 minutes.
- Uncover and bake 15 more minutes. Rest for 10 minutes before serving.
Notes
- Rice: Use long-grain white rice only. Do not use instant or brown rice.
- Sodium: Use low-sodium broth and unsalted butter to prevent the dish from being too salty.
- Liquid: If rice is still hard, add a splash of water and bake covered for 10 more minutes.
- Prep Time: 5 minutes
- Cook Time: 1 hour
- Category: Dinner
- Method: Bake
- Cuisine: American
Nutrition
- Serving Size: 1 Serving
- Calories: 580 kcal
- Sugar: 2g
- Sodium: 890mg
- Fat: 32g
- Saturated Fat: 16g
- Unsaturated Fat: 10g
- Trans Fat: 1g
- Carbohydrates: 42g
- Fiber: 1g
- Protein: 28g
- Cholesterol: 115mg
Keywords: Stick of Butter Chicken and Rice, Dump and Bake Casserole, Easy Chicken Rice Recipe, Onion Soup Mix Chicken, No Peek Chicken, 5 Ingredient Dinner