Cheesy Garlic Chicken Wraps: The Ultimate Crispy Comfort Food
If there is one universal truth I have discovered in my years in the kitchen, it is that almost anything tastes better when wrapped in a warm, golden-brown tortilla. But not just any wrap—I’m talking about something that hits every single craving button: savory, creamy, cheesy, and satisfyingly crunchy.
Welcome back to Recipes Nora! Today, I am sharing a recipe that has quickly become a legend in my household and, I suspect, will soon be a regular rotation in yours: Cheesy Garlic Chicken Wraps.
We are moving past the sad, soggy lunch wraps of the past. These are next-level. Imagine tender shredded chicken tossed in a creamy, garlic-infused sauce, packed with melted cheddar cheese, and then seared in a hot skillet until the outside is shatteringly crisp and the inside is a molten, gooey masterpiece. It’s a cross between a quesadilla and a gourmet burrito, and it is ready in just 20 minutes.
Whether you need a quick weeknight dinner, a high-protein post-gym meal, or a game-day snack that will disappear in seconds, this recipe is your answer. Let’s dive into how to make the best chicken wrap you will ever eat.
Why This Recipe Works
As a chef, I am always looking for the balance of texture and flavor. This dish is a masterclass in both, using simple pantry ingredients to create something that tastes complex.
- The “Glue” Factor: The secret to a wrap that doesn’t fall apart is the cheese. By layering cheese on both the bottom and top of the filling, we create a melted seal that holds everything together once heat is applied.
- The Sauce Ratio: Many wraps are dry and bland. We fix this by mixing the chicken directly into a custom creamy garlic sauce before it even hits the tortilla. This ensures every single bite of chicken is coated in flavor, rather than having dry pockets of meat.
- The Texture Contrast: The filling is soft, creamy, and gooey, which needs a counterpoint. By pan-searing the finished wraps in a little oil (or butter), we create a rigid, crunchy exterior shell. That first bite—crunch, then cream—is what makes this dish addictive.
- Versatility: This is a “clear the fridge” hero. Have leftover rotisserie chicken? Perfect. A block of cheddar you need to use? Great. It’s endlessly adaptable to whatever you have on hand.
Ingredient Deep Dive
To get that restaurant-quality taste at home, the details matter. Here is exactly what you need and why I chose these specific ingredients.
The Protein: Cooked Chicken
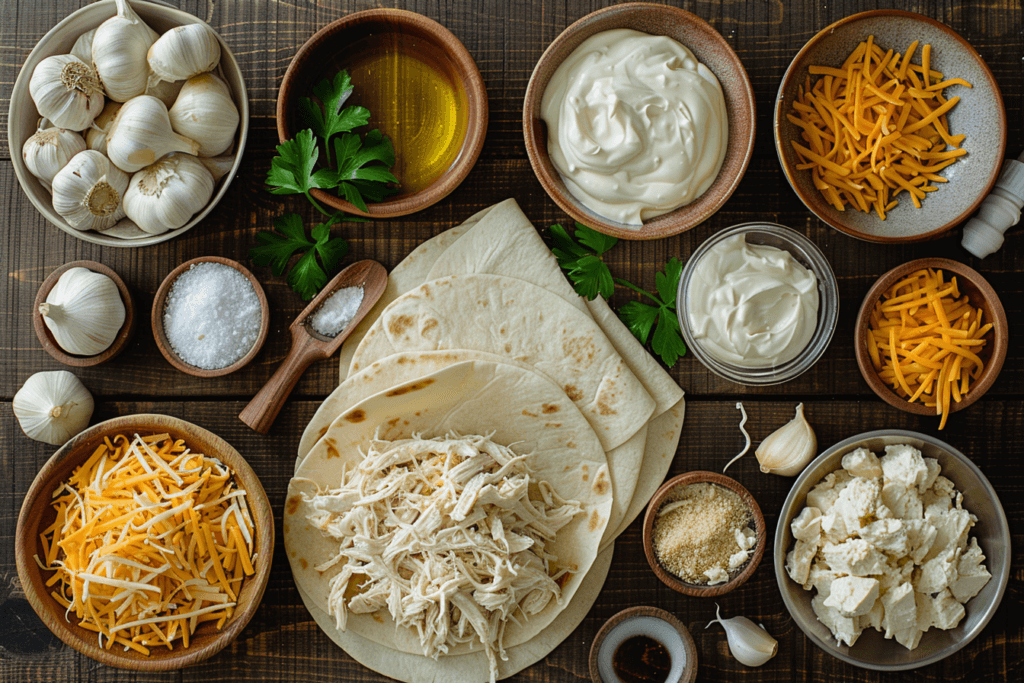
You need about 2 to 3 cups of cooked, shredded, or diced chicken.
- Rotisserie Chicken: This is my top recommendation for speed and flavor. It’s already seasoned and tender.
- Poached Chicken Breast: If you want a leaner option, poach chicken breasts in salted water with a bay leaf, then shred them with two forks.
- Leftovers: Did you make my Sunday Roast Chicken? Chop up the leftovers! Both white and dark meat work beautifully here.
The Flavor Base: The Creamy Garlic Sauce
This is the heart of the recipe. We aren’t just squirting mayo on a tortilla; we are building a compound sauce.
- Mayonnaise: Provides the rich, creamy base. Use a high-quality real mayo for the best mouthfeel.
- Greek Yogurt (or Sour Cream): This is crucial. Mayo alone can be too heavy and oily. A scoop of plain Greek yogurt adds a tangy brightness that cuts through the fat and lightens the filling.
- Fresh Garlic: We are using fresh minced garlic and a touch of garlic powder. The fresh garlic gives that spicy, aromatic punch, while the powder provides a savory, toasted background note.
- Hot Sauce: A dash of vinegar-based hot sauce (like Frank’s RedHot) doesn’t make this spicy. It adds acid and “zing,” waking up the other heavy flavors.
- Parsley: Fresh chopped parsley adds a grassy, herbal note that makes the wrap taste fresh rather than just greasy.
The Cheeses
I recommend a two-cheese blend for the ultimate pull and flavor.
- Sharp Cheddar: For that classic bold, tangy flavor.
- Mozzarella: Cheddar can sometimes be oily when melted. Mozzarella is the “stretchy” cheese. It melts beautifully and holds the wrap together without overpowering the garlic chicken.
- Chef’s Tip: Grate your own cheese if you can! Pre-shredded cheese is coated in potato starch to prevent clumping, which means it doesn’t melt as smoothly as fresh block cheese.
The Wrapper
- Flour Tortillas: You want “burrito size” (10-inch) flour tortillas. Corn tortillas will crack, and smaller taco sizes won’t hold enough filling.
- Low-Carb Options: If you are keto or watching carbs, there are many excellent low-carb high-fiber tortillas on the market that crisp up surprisingly well.
Step-by-Step Instructions
Cooking is about process. Follow these steps to ensure your wraps are crispy, not soggy, and perfectly heated through.
Step 1: Create the Filling Mixture

In a large mixing bowl, combine your mayonnaise, Greek yogurt, minced garlic, hot sauce, salt, and black pepper. Whisk it until it is smooth and unified. Toss in your shredded cooked chicken and the chopped fresh parsley. Stir well until every strand of chicken is coated in the creamy white sauce.
- Why do this first? Mixing the chicken with the sauce ensures the meat stays moist while the wrap toasts.
Step 2: Warm Your Tortillas
This is a step most home cooks skip! Cold tortillas are stiff and prone to cracking. Place your tortillas on a microwave-safe plate and zap them for 15-20 seconds. This relaxes the gluten and makes them pliable and easy to roll.
Step 3: The Assembly Line
Lay a warm tortilla flat on your cutting board or counter. We are going to build this in layers:
- The Base: Sprinkle a small handful of cheese in the center of the tortilla.
- The Core: Spoon a generous portion (about ½ to ¾ cup) of the chicken mixture on top of the cheese.
- The Glue: Top the chicken with another handful of cheese.
- The Crunch (Optional): If you like fresh textures, this is the moment to add some diced green onions or diced red bell peppers.
Step 4: The Perfect Fold
Folding a wrap is an art form.
- Fold the left and right sides of the tortilla inward towards the center, covering the sides of the filling.
- While holding those sides in, fold the bottom flap up and over the filling.
- Tuck the filling in tightly as you roll the wrap forward until it is completely closed.
- Place the wrap seam-side down on a plate. The weight of the wrap will help seal it while you finish the others.
Step 5: The Sear
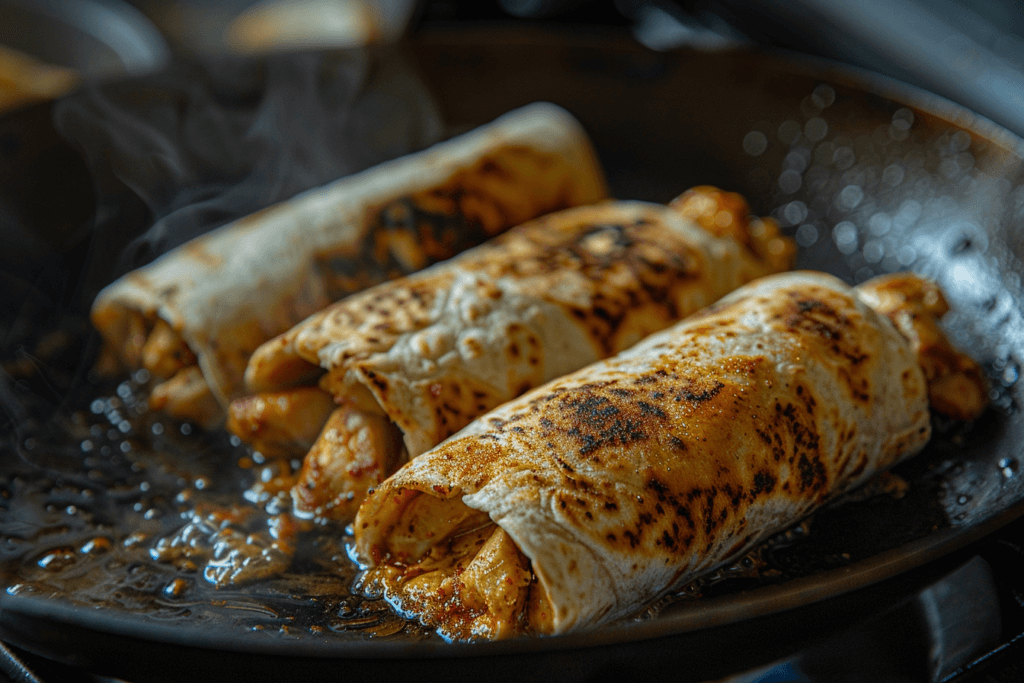
Grab a large non-stick skillet or cast-iron pan. Place it over medium heat.
- Chef’s Note: Do not use high heat! High heat will burn the tortilla before the cheese inside has melted. Brush the pan with a little olive oil or melt a knob of butter. Place the wraps in the pan, seam-side down first. This instantly sears the flap shut so your wrap doesn’t unravel. Cook for 3 to 4 minutes per side. You are looking for a deep, golden-brown color and a crispy texture.
- The Lid Trick: If your wraps are thick and you are worried the center is cold, place a lid on the pan for the first 2 minutes of cooking. This traps steam and melts the cheese faster. Remove the lid for the final crisping.
Step 6: Rest and Serve
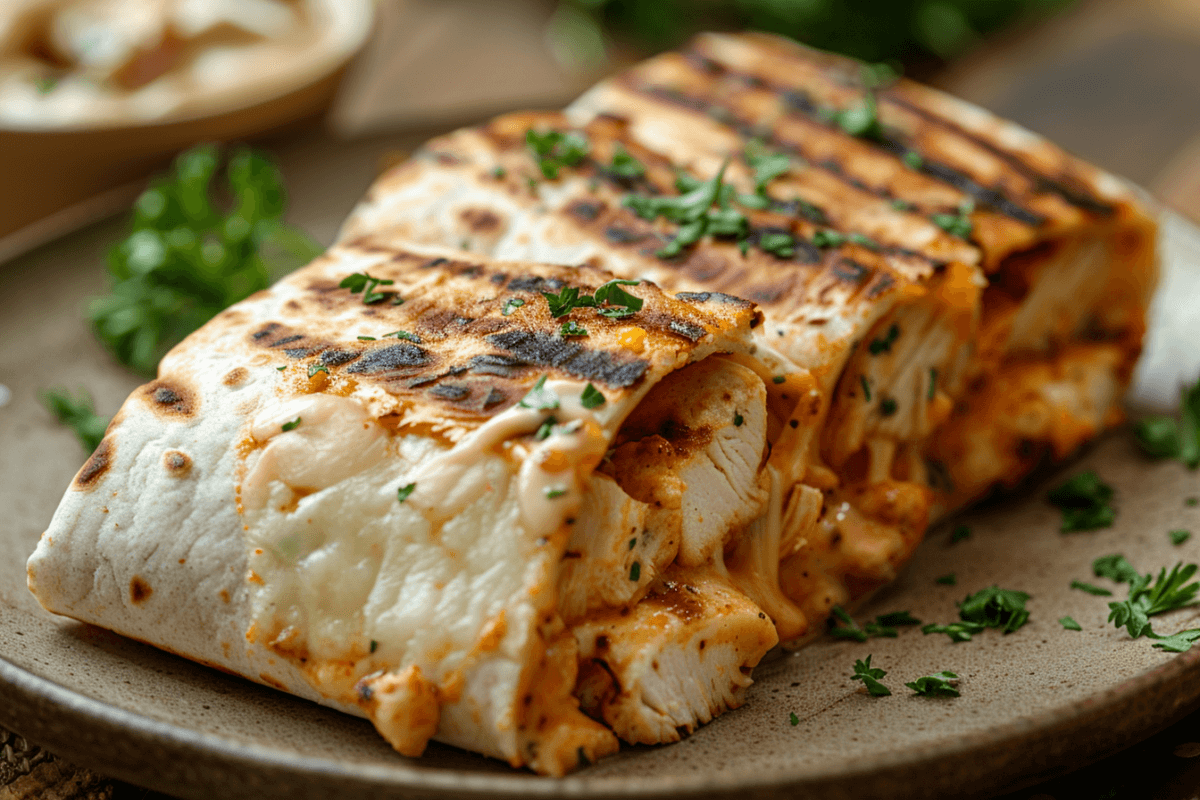
Remove the wraps from the pan and let them rest on a cutting board for 1-2 minutes. This allows the cheese to set slightly so it doesn’t ooze out everywhere when you cut it. Slice them in half on a bias (diagonally) for that beautiful presentation and serve immediately.
Troubleshooting: Avoiding the “Soggy Wrap”
There is nothing worse than biting into a wrap that is mushy. Here is how to guarantee the crunch.
- Don’t Over-Sauce: The chicken mixture should be creamy and coated, but not swimming in liquid. If your mixture looks watery, add a little more chicken or cheese to bulk it up.
- Eat Immediately: Cream-based fillings will eventually soften the tortilla. These are best eaten fresh off the pan.
- Proper Heat Control: If your heat is too low, the tortilla sits in the oil and absorbs it like a sponge. If it’s too high, it burns. Medium heat creates the “frying” effect needed for crispiness.
- Avoid Wet Veggies: While tomatoes are delicious, they release water when heated. If you want to add veggies inside, stick to low-moisture options like spinach, peppers, or corn. Serve juicy veggies like tomatoes or cucumbers on the side.
Variations to Keep It Interesting
Once you master the base recipe, the sky is the limit. Here are three variations I love making for my family:
1. The Buffalo Blue
Swap the garlic sauce for a mix of Buffalo wing sauce and ranch dressing. Add crumbled blue cheese along with the cheddar. It’s spicy, tangy, and perfect for game day.
2. The Bacon Ranch
Add crispy chopped bacon bits to the chicken mixture. Swap the garlic sauce for your favorite thick Ranch dressing. This is a massive hit with kids.
3. The “Hidden Veggie”
If you are trying to get more nutrition into your diet, mix finely chopped fresh spinach and grated zucchini into the hot chicken mixture. The cheese and garlic mask the veggies so well, you barely notice them!
Make-Ahead and Storage Tips
Can you meal prep these? Absolutely, but with a few caveats.
- Prep the Filling: You can mix the chicken, sauce, and spices up to 3 days in advance. Store it in an airtight container in the fridge. When you are ready to eat, just assemble and fry.
- Freezing: I do not recommend freezing these wraps once assembled. Mayonnaise and yogurt tend to separate and become oily when frozen and thawed. However, you can freeze plain cooked shredded chicken and cheese separately.
- Reheating: If you have a leftover cooked wrap, do not microwave it! It will become a soft, rubbery mess. Reheat it in a dry skillet over medium heat, or in an air fryer at 350°F (175°C) for 3-4 minutes to revive the crispiness.
Serving Suggestions
These Cheesy Garlic Chicken Wraps are rich and hearty, so they pair best with lighter sides that have some acidity or crunch.
- A Simple Green Salad: Arugula tossed with lemon juice, olive oil, and parmesan cuts through the richness of the wrap perfectly.
- Roasted Vegetables: Garlic roasted broccoli or asparagus adds fiber and color to the plate.
- Chips and Salsa: Lean into the Tex-Mex vibe with some tortilla chips and a fresh pico de gallo.
- Soup: In the winter, serve half a wrap alongside a bowl of tomato basil soup for dipping.
Final Thoughts from Chef Noah
Cooking doesn’t always have to be about hours of simmering or complex French techniques. Sometimes, the best meals are the ones that bring everyone to the table with a smile. These Cheesy Garlic Chicken Wraps are humble, but they are packed with heart and flavor.
I hope you give this recipe a try. It’s one of those “back pocket” recipes that will save you on a busy night when you are tempted to order takeout. Trust me, these taste better than anything you can get at a drive-thru.
As always, happy cooking!
Print
Cheesy Garlic Chicken Wraps: The Ultimate Crispy Comfort Food
- Total Time: 20 minutes
- Yield: 4 Wraps 1x
- Diet: Halal
Description
Crispy, golden-brown tortillas stuffed with tender shredded chicken, a creamy garlic herb sauce, and melted cheddar and mozzarella cheese. A quick 20-minute meal perfect for lunch or dinner.
Ingredients
- 2 ½ cups cooked chicken, shredded or diced (Rotisserie recommended)
- 1 cup shredded sharp cheddar cheese
- 1 cup shredded mozzarella cheese
- 2 green onions, finely sliced (optional)
- 3 tbsp mayonnaise
- 2 tbsp plain Greek yogurt (or sour cream)
- 2 cloves fresh garlic, minced
- ½ tsp garlic powder
- 1 tsp hot sauce
- ½ tsp salt
- ¼ tsp black pepper
- 1 tbsp fresh parsley, chopped
- 4 large flour tortillas (10-inch burrito size)
- 1 tbsp olive oil or butter (for frying)
Instructions
- In a large bowl, whisk together mayonnaise, Greek yogurt, minced garlic, garlic powder, hot sauce, salt, pepper, and parsley until smooth.
- Add the shredded chicken to the bowl and toss until thoroughly coated in the sauce.
- Microwave tortillas for 20 seconds to make them pliable.
- Lay a tortilla flat and sprinkle a layer of mixed cheese in the center. Top with ¼ of the chicken mixture, green onions, and another layer of cheese.
- Fold the sides inward, bring the bottom flap up, and roll tightly to seal the wrap.
- Heat olive oil or butter in a large skillet over medium heat. Place wraps seam-side down in the pan.
- Cook for 3-4 minutes per side until golden brown and crispy.
- Remove from heat, let rest for 1 minute, slice diagonally, and serve hot.
Notes
- Spice Level: Add a pinch of cayenne or diced jalapeños for extra heat.
- Make Ahead: The chicken filling can be prepared up to 3 days in advance and stored in the fridge.
- Reheating: Reheat leftovers in a dry skillet or air fryer to maintain crispiness; do not microwave.
- Prep Time: 10 minutes
- Cook Time: 10 minutes
- Category: Main Course
- Method: Pan Fry
- Cuisine: American
Nutrition
- Serving Size: 1 Wrap
- Calories: 520 kcal
- Sugar: 2g
- Sodium: 980mg
- Fat: 28g
- Saturated Fat: 12g
- Unsaturated Fat: 14g
- Trans Fat: 0g
- Carbohydrates: 34g
- Fiber: 2g
- Protein: 32g
- Cholesterol: 95mg
Keywords: Cheesy Chicken Wraps, Garlic Chicken Wrap Recipe, Crispy Chicken Tortilla, Easy Lunch Ideas, Leftover Chicken Recipes, 20 Minute Dinner